Tuesday, 27 October 2015

Seaside Chair


This rather disgraceful looking chair was bought from IKEA about 16 years ago. At first it was the chair that I had in my son's room next to his cot, so I had somewhere comfy to sit and feed him during the night. It has moved around the house, and more recently has become the chair my soon-to-be 95 year old mother likes to sit in when she visits us. It is fairly small, which suits her, and can be moved up really close to the TV. But as you can see it has become very tatty.
 
The covers are removable, so I decided it was time to give it a make over. The first job was to take apart the old covers. This unpicking took me a lot of work, but I thought it was the best way to make sure I had accurate pattern pieces.


The second job, which took me almost as long, was to pick a fabric. After a lot of trips to fabric shops, I decided that the best way to make the job least stressful was to pick something relatively inexpensive. There is nothing worse than having an expensive fabric to cut into, when you are not completely confident that the project is going to work. I also knew that some sections had to be gathered, so didn't want anything too thick. I also wanted something washable, as being realistic we do have quite a few spills.


Work in progress ...

I loved this rather unique seaside fabric. It doesn't really go with the living room, so the chair may live in a bedroom, and just be brought down when Granny comes to visit.


The sewing was much easier than I imagined. A professional upholsterer may have done a better job, but I think it has given the chair a new lease of life. For the seat cushion I used some heavy weight denim that I already had, as I thought it needed something a bit more hardwearing, and the seaside fabric might be a bit much over the whole chair.


Well someone is very happy and is already making herself at home on the new seaside chair!

Saturday, 24 October 2015

Pumpy the Pumpkin

There is a point with children when you will probably find yourself saying, "no more cuddly toys". There is only so much love to spread around the ones that you already have. I reached this point a few years ago, but made an exceptions for Pumpy the Pumpkin.  I know this isn't a snapshot, but hope you enjoy it as much as we did.

Wednesday, 21 October 2015

Spooky Stanley Spider


Since it is the time of year for spookiness and all things creepy, I just thought I would show you my Spooky Stanley Spider. Actually I think he is not really frightening, just a little glum.

He is very easy to make. He is knitted flat on two needles, with icord legs. His feet are black buttons, although I think beads also would work well. Link to the pattern on Craftsy is in my lefthand sidebar.

I used Rowan Fine Tweed (Pendle), and knitted two Stanleys from one 25g ball. I think other wools would work well, although you would need to adjust the needle size. I liked the rough bumpy texture of this brand. 

Friday, 16 October 2015

Conkers


I don't often repeat posts, but it is that time of year again. When I showed this before there was quite a bit of interest in the game of conkers. So apologies if you have already seen this, or if you live on the other side of the world, and are looking forward to Spring.


Conkers are the fruit of the horse chestnut tree. Finding a spikey green case,  slightly split open, and removing a shiny conker from its white cushion, is one of the pleasures of Autumn. But it has been on my mind that my pattern did not include the conker case. So I have reworked the pattern adding a shell section. So now you can make a lovely little home for your conkers. The new pattern is available on ravelry and Craftsy.


The shell is knitted on just two straight needles and in two pieces: green and cream. So the only sewing up is joining the inner and outer shells. There is some short row knitting to create the curves. As you will see I have made two variations: a half shell, which is how I often find a conker on the ground, or the two halves sewn together so you can have your conker just peeping out.


The game conkers is played between two people. A hole is made in the conkers, and they are threaded on a piece of string. They take turns hitting each others conker with their own. Each player holds their conker out in front of themselves, and the other player takes a swing at it with their conker. The conker that breaks the other one is the victor. The dangers are that you can be hit by swinging conkers, which are quite hard, or being hit by flying shards of conkers when the hit is successful. Hard conkers usually win, but it is considered cheating to harden your conker artificially.  Apparently Michael Palin of Monty Python was disqualified from a conkers competition for baking his conker and soaking it in vinegar.

Then there is the whole business of scoring. A conker that defeats another is a oner, etc. But if a conker beats another conker, it also takes on that conker's score. So if a twoer beats a threer, it would become a fiver. It is that conker that takes the title, not the human swinging it! 


 Happy Autumn Conkering


Friday, 9 October 2015

Northern Lights Dress and Intarsia Knitting


The idea for this design came from the beautiful colours in the wool (James Brett), and also that I sort of love Polar Bears. I knitted a polar bear sample square a while ago, with the idea of using it on a garment. I have an idea for a polar bear hat, possibly with smaller bears.


The dress/top pattern is basically the smallest version of my Baby Daisy Dress, and although I love the finished result, I've decided not to publish this polar bear version as a pattern, mainly because it was such a tricky knit. I thought the snowflakes would make it a bit easier, as the white wool is carried across the back on the blue parts, but the blue is not carried behind most of the bear (except on the leg section), as it was such dark wool it would show. 

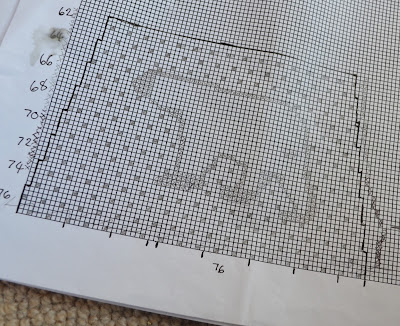
Here is a photo of the chart that I made to use on this design. As you can see it all gets a bit scrappy. When I make a chart it usually involves a lot of tracing paper and transposing marks. There is also then the problem of how to get a large chart into a pattern document. (I had the same problem with my Tree Cushion, where the chart was absolutely enormous.) 


There must be an easier way to make a chart I thought, and with a bit of surfing around, I have found it. The Knitting Site has software to convert any digital picture into a knitting chart. You can scale the chart up or down, according to the wool you are using and how much detail you want in your design. So although I didn't use it for this bear, and can see myself coming back here for some other intarsia designs.


And here is the little lady wearing it ...


Thursday, 1 October 2015

Crochet Diary - Hat or Fruit Bowl?


I tend with knitting to write about projects that I have finished, and that have worked. But with this crochet diary, I think I need to show you the failures as well, as it is meant to be an honest look at my learning.

I wanted to try and make a crochet bowl. I have seen some really beautiful bowls and baskets online, but couldn't find a pattern I could follow. So I thought I would just busk it. The bowl caused much hilarity among the family, as it did not have any rigidity, and was not even very nice to look at. More of a shapeless bag than a bowl.

So I changed the plan, and wondered if I kept going I could turn it into a stylish hat. This also caused another bout of teasing, and threats that no one would ever go out of the house with me if I wore it ...

So I think I have learned something, and that is that I am not ready to crochet without a pattern.

The old problem of how to photograph yourself in a hat

The whole thing has been unravelled, and I am back to thinking about granny squares and blankets.